Working with Nvidia Tensor RT and Pose Estimation - Part 2

Photo by Joshua Sortino on Unsplash
Using a custom Pytorch model with Tensor RT - Part 2⌗
Our Goal: to create a ROS Node for Pose Estimation
Prerequisites⌗
Make sure you have followed the previous tutorial Here to install dependencies.
Make sure you have done the following from the repo
- downloaded the
/parse/folder and put it in your<catkin-workspace>/<your-package>/src/directory. - downloaded
plugins.cppandplugins.hppfiles to your<catkin-workspace>/<your-package>/src/directory.
Parsing model results class⌗
Create the 2 files ParseObjects.cpp and ParseObjects.hpp in your <catkin-workspace>/<your-package>/src/ directory
Lets fill these out
ParseObjects.cpp
#include "plugins.hpp"
#include "Tensor.h"

#include "parse/connect_parts.hpp"
#include "parse/find_peaks.hpp"
#include "parse/munkres.hpp"
#include "parse/paf_score_graph.hpp"
#include "parse/refine_peaks.hpp"

#include <vector>

namespace trt_pose {
  namespace plugins {

    using namespace trt_pose::parse;
//     using namespace trt_pose::train;
    using namespace jetsoncam;

    std::vector<Tensor<int>> find_peaks_torch(
        Tensor<float> input,
        const float threshold,
        const int window_size,
        const int max_count
    )
    {
        const int N = input.size(0);
        const int C = input.size(1);
        const int H = input.size(2);
        const int W = input.size(3);
        const int M = max_count;

        // printf("find_peaks_torch, {N,C,H,W,M}-> {%d,%d,%d,%d,%d}\n", N,C,H,W,M);

        // create output tensors
        Tensor<int> counts = Tensor<int>(
            "counts",
            {N, C}
        );

        Tensor<int> peaks = Tensor<int>(
            "peaks",
            {N, C, M, 2}
        );

        // find peaks
        // get pointers to tensor data
        int *counts_ptr = (int *)counts.data_ptr();
        int *peaks_ptr = (int *)peaks.data_ptr();
        const float *input_ptr = (const float *)input.data_ptr();

        // find peaks
        find_peaks_out_nchw(
            counts_ptr,
            peaks_ptr,
            input_ptr,
            N, C, H, W, M,
            threshold,
            window_size
        );

        return {counts, peaks};
    }


    Tensor<float> refine_peaks_torch(
        Tensor<int> counts,
        Tensor<int> peaks,
        Tensor<float> cmap,
        int window_size
    ) {

        Tensor<float> refined_peaks = Tensor<float>(
            "refined_peaks",
            {peaks.size(0), peaks.size(1), peaks.size(2), peaks.size(3)}
        );

        // printf("refine_peaks_torch, cmap.dims_size:: %lu, cmap.dims(3):: %d\n", cmap.dims_size, cmap.size(3));

        const int N = cmap.size(0);
        const int C = cmap.size(1);
        const int H = cmap.size(2);
        const int W = cmap.size(3);
        const int M = peaks.size(2);

        // printf("refine_peaks_torch, {N,C,H,W,M}-> {%d,%d,%d,%d,%d}\n", N,C,H,W,M);
        // printf("refine_peaks_torch: peaks.size(0): %d, peaks.size(1): %d, peaks.size(2): %d, peaks.size(3): %d\n", peaks.size(0), peaks.size(1), peaks.size(2), peaks.size(3));

        refine_peaks_out_nchw(
            (float *)refined_peaks.data_ptr(),
            (const int *)counts.data_ptr(),
            (const int *)peaks.data_ptr(),
            (const float *)cmap.data_ptr(),
            N, C, H, W, M,
            window_size
        );
        return refined_peaks;
    }


    Tensor<float> paf_score_graph_torch(
        Tensor<float> paf,
        Tensor<int> topology,
        Tensor<int> counts,
        Tensor<float> peaks,
        const int num_integral_samples
    ) {

        const int N = peaks.size(0);
        const int K = topology.size(0);
        const int M = peaks.size(2);

        // printf("paf_score_graph_torch, {N,K,M}-> {%d,%d,%d}\n", N,K,M);

        Tensor<float> score_graph = Tensor<float>(
            "score_graph",
            {N, K, M, M}
        );

        const int N_2 = paf.size(0);
        const int K_2 = topology.size(0);
        const int C_2 = peaks.size(1);
        const int H_2 = paf.size(2);
        const int W_2 = paf.size(3);
        const int M_2 = score_graph.size(3);

        // printf("paf_score_graph_torch, {N_2,K_2,C_2,H_2,W_2,M_2}-> {%d,%d,%d,%d,%d,%d}\n", N_2,K_2,C_2,H_2,W_2,M_2);

        paf_score_graph_out_nkhw(
            (float *)score_graph.data_ptr(),
            (const int *)topology.data_ptr(),
            (const float *)paf.data_ptr(),
            (const int *)counts.data_ptr(),
            (const float *)peaks.data_ptr(),
            N_2, K_2, C_2, H_2, W_2, M_2,
            num_integral_samples
        );

        return score_graph;
    }


    Tensor<int> assignment_torch(
        Tensor<float> score_graph,
        Tensor<int> topology,
        Tensor<int> counts,
        float score_threshold
    ) {
        int N = counts.size(0);
        int K = topology.size(0);
        int M = score_graph.size(2);

        // printf("assignment_torch, {N,K,M}-> {%d,%d,%d}\n", N,K,M);

        Tensor<int> connections = Tensor<int>(
            "connections",
            {N, K, 2, M},
            -1
        );

        const int C = counts.size(1);
        void *workspace = (void *)malloc(assignment_out_workspace(M));

        assignment_out_nk(
            (int *)connections.data_ptr(),
            (const float *)score_graph.data_ptr(),
            (const int *)topology.data_ptr(),
            (const int *)counts.data_ptr(),
            N, C, K, M,
            score_threshold,
            workspace
        );

        free(workspace);

        return connections;
    }


    std::vector<Tensor<int>> connect_parts_torch(
        Tensor<int> connections,
        Tensor<int> topology,
        Tensor<int> counts,
        int max_count
    )
    {

        int N = counts.size(0);
        int K = topology.size(0);
        int C = counts.size(1);
        int M = connections.size(3);

        // printf("connect_parts_torch, {N,K,C,M,max_count}-> {%d,%d,%d,%d,%d}\n", N,K,C,M,max_count);

        Tensor<int> objects = Tensor<int>(
            "objects",
            {N, max_count, C},
            -1
        );

        Tensor<int> object_counts = Tensor<int>(
            "object_counts",
            {N}
        );

        const int N_2 = object_counts.size(0);
        const int K_2 = topology.size(0);
        const int C_2 = counts.size(1);
        const int M_2 = connections.size(3);
        const int P_2 = max_count;

        // printf("connect_parts_torch, {N_2,K_2,C_2,M_2,P_2}-> {%d,%d,%d,%d,%d}\n", N_2,K_2,C_2,M_2,P_2);

        void *workspace = malloc(connect_parts_out_workspace(C_2, M_2));
        connect_parts_out_batch(
            (int *) object_counts.data_ptr(),
            (int *) objects.data_ptr(),
            (const int *) connections.data_ptr(),
            (const int *) topology.data_ptr(),
            (const int *) counts.data_ptr(),
            N_2, K_2, C_2, M_2, P_2,
            workspace
        );
        free(workspace);

        return {object_counts, objects};
    }


    Tensor<int> coco_category_to_topology(std::vector<std::vector<int>> skeleton)
    {

        const int K = static_cast<int>(skeleton.size());

        // create output tensors
        Tensor<int> topology = Tensor<int>(
            "topology",
            {K, 4}
        );

        // printf("coco_category_to_topology, {K, 4}-> {%d, 4}\n", K);

        for (int k = 0; k < K; k++) {
            std::vector<int> skel_item = skeleton[k];
            topology.CUDA[(k * 4) + 0] = 2 * k;
            topology.CUDA[(k * 4) + 1] = 2 * k + 1;
            topology.CUDA[(k * 4) + 2] = skel_item[0] - 1;
            topology.CUDA[(k * 4) + 3] = skel_item[1] - 1;
        }

        return topology;
    }
  } // namespace plugins
} // namespace trt_pose
ParseObjects.hpp
#ifndef __JETSONCAM_PARSE_OBJECTS_H__
#define __JETSONCAM_PARSE_OBJECTS_H__

#include "Tensor.h"

#include <vector>
#include <stdint.h>


namespace trt_pose {

    using namespace jetsoncam;

    class ParseObjects
    {
        public:
            ParseObjects();

            ParseObjects(
                Tensor<int> top
            );

            ParseResult Parse(Tensor<float> cmap, Tensor<float> paf);

        protected:
            Tensor<int> topology;
    };
}

#endif
Parse Class Explanation⌗
- This class exists as an interface to the libraries in the
/parse/folders usingplugins.cppandplugins.hpp - Our model result Tensors (CMAP, PAF) are converted into Object Tensors that we can use for drawing i.e.
Tensor<int> object_countsTensor<int> objectsTensor<float> normalized_peaks
- These three results will be fed into the GPU for drawing in our next post
poseNet API Class⌗
Create the file node_imagetaker_posenet.cpp in your <catkin-workspace>/<your-package>/src/ directory
Lets fill these out
node_imagetaker_posenet.h
#include <ros/ros.h>

#include <image_transport/image_transport.h>
#include <cv_bridge/cv_bridge.h>

#include <opencv2/imgproc/imgproc.hpp>
#include <opencv2/highgui/highgui.hpp>
#include <opencv2/imgcodecs.hpp>

#include <sensor_msgs/image_encodings.h>
#include <sensor_msgs/Image.h>

#include <vision_msgs/Detection2DArray.h>
#include <vision_msgs/VisionInfo.h>

#include "poseNet.h"
#include <jetson-utils/cudaMappedMemory.h>

#include "image_converter.h"
#include "image_ops.h"

#include <unordered_map>

using namespace cv;
using namespace std;

// globals
poseNet* net = NULL;

imageConverter* in_cvt = NULL;

ros::Publisher* pose_pub = NULL;


// input image subscriber callback
void img_callback( const sensor_msgs::ImageConstPtr& input )
{
    ROS_INFO ("Received Image");

    // convert sensor_msgs[rgb] to opencv[brg]
    cv_bridge::CvImagePtr cv_ptr;
    cv_bridge::CvImagePtr cv_ptr_flip; // pointer for flipped image
    try
    {
        // sensor_msgs::image_encodings::BGR8
        cv_ptr = cv_bridge::toCvCopy(
            input,
            sensor_msgs::image_encodings::BGR8
        );

        cv_ptr_flip = cv_bridge::toCvCopy(
            input,
            sensor_msgs::image_encodings::BGR8
        );
    }
    catch (cv_bridge::Exception& e)
    {
        ROS_ERROR("cv_bridge exception: %s", e.what());
        return;
    }

    // we are doing a 180 deg flip since
    // my camera is upside down
    const int img_flip_mode_ = -1;
    // flip the image
    cv::flip(cv_ptr->image, cv_ptr_flip->image, img_flip_mode_);

    // convert converted image back to a sensor_msgs::ImagePtr
    // for use with nvidia / other ML algorithms
    sensor_msgs::ImagePtr flippedImage = cv_ptr_flip->toImageMsg();

    // convert the image TO reside on GPU
    // the converting TO and converting FROM are the SAME funtion name
    // with different signatures
    if( !in_cvt || !in_cvt->Convert(flippedImage) )
    {
        ROS_ERROR (
            "failed to convert %ux%u %s image",
            flippedImage->width,
            flippedImage->height,
            flippedImage->encoding.c_str()
        );
        return;
    }
    else {
        ROS_INFO (
            "Converted %ux%u %s image",
            flippedImage->width,
            flippedImage->height,
            flippedImage->encoding.c_str()
        );
    }

    // generate pose parameters and overlay on the input image
    const bool processed = net->Process(
        in_cvt->ImageGPU(),
        in_cvt->GetWidth(),
        in_cvt->GetHeight()
    );

    // process the segmentation network
    if (!processed)
    {
        ROS_ERROR(
            "failed to process pose on %ux%u image",
            flippedImage->width,
            flippedImage->height
        );
        return;
    }

    CUDA(cudaDeviceSynchronize());

    // populate the message
    sensor_msgs::Image msg;
    // get our image with overlays back from the GPU
    // the converting TO and converting FROM are the SAME funtion name
    // with different signatures
    if( !in_cvt->Convert(msg, sensor_msgs::image_encodings::BGR8) ) {
        return;
    }
    pose_pub->publish(msg);
}


int main (int argc, char **argv) {
    ros::init(argc, argv, "imagetaker_posenet");

    ros::NodeHandle nh;
    ros::NodeHandle private_nh("~");

    // use this so we can pass parameters via command line e.g
    // rosrun <package-name> imagetaker_homographynet

    // create network using the built-in model
    /*
    net = poseNet::Create();
    */

    net = poseNet::Create(
        poseNet::DENSENET121_BASELINE_ATT_256x256
    );

    if(!net)
    {
        ROS_ERROR("failed to load poseNet model");
        return 0;
    }

    /*
    * create image converters
    */
    in_cvt = new imageConverter();


    if( !in_cvt )
    {
        ROS_ERROR("failed to create imageConverter objects");
        return 0;
    }

    /*
    * advertise publisher topics
    */
    ros::Publisher pose_publsh = private_nh.advertise<sensor_msgs::Image>("posenet_result", 2);
    pose_pub = &pose_publsh;


    /*
    * subscribe to image topic
    */
    ros::Subscriber img_sub = nh.subscribe(
        "/csi_cam_0/image_raw",
        5,
        img_callback
    );

    /*
    * wait for messages
    */
    ROS_INFO("PoseNet Node initialized, waiting for messages");

    ros::spin();

    return 0;
}
Add the following to your CMakeLists.txt
# used to compile CUDA files .cu, .cuh
CUDA_COMPILE(posenet_cuda_o  src/poseNet.cu)

# add library files that we would NOT change
# in 'src/parse/*'
file(GLOB parseSrc
    "src/parse/*.cpp"
)

# add the compiled CUDA *.o files here
add_executable(imagetaker_posenet
    src/node_imagetaker_posenet.cpp
    src/image_converter.cpp
    src/image_ops.cpp
    src/poseNet.cpp
    ${posenet_cuda_o}
    src/plugins.cpp
    src/ParseObjects.cpp
    ${parseSrc}
)
target_link_libraries(imagetaker_posenet
    ${catkin_LIBRARIES}
    jetson-inference
    jetson-utils
)
- note the
GLOBand the${parseSrc}for compiling all files in a folder! - The rest, you have seen before
PoseNet ROS Node explanation⌗
This class is similar to other nodes we have explored (ResNet, ImageNet, DetectNet)
They simply declare bootstapping code for the ROS Node i.e.
- Name the node
- Set up publishers and subscribers
- Load the model and optimize it with Tensor RT
When the node receives an image, it will run pose estimation on it and publish an image showing the detected pose points.
Verify⌗
Run catkin_make to compile your code and make sure no errors show up
If any errors show up, make a comment and I will try to help you with it
In a terminal run
roscore
In another terminal run
# we are running at 1280x720 @ 24 FPS for now
roslaunch jetson_csi_cam jetson_csi_cam.launch sensor_id:=0 width:=1280 height:=720 fps:=24
# if your camera is in csi port 1 change sensor_id to 1
- NOTE: you may see a warning about a camera calibration file, you can ignore it
In a third terminal run
# specified model
rosrun <package-name> imagetaker_posenet
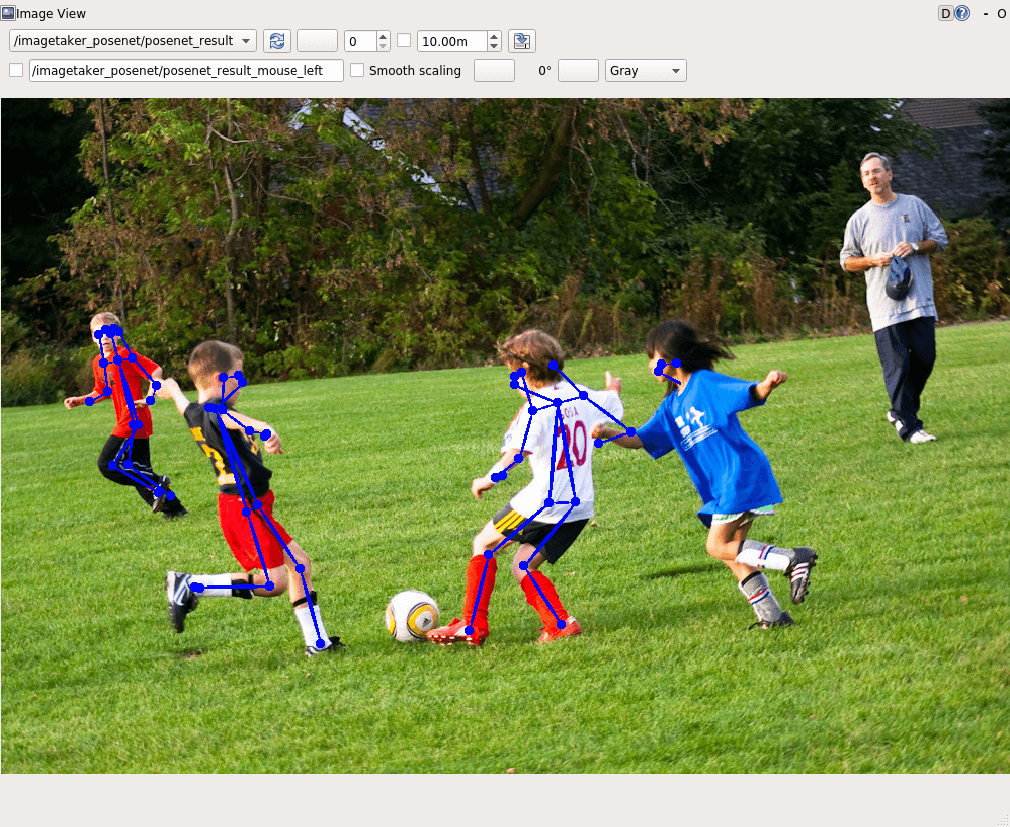
In rqt_image_view click the drop down and select either imagetaker_posenet/posenet_result to see the image segmentation results in real-time!
Notes and Tips⌗
- Use
rosparamto set parameters for nodes - Use image_publisher to publish test images, then pipe those images into our node
# set our parameters
# our node expects upside down images due to camera orientation
rosparam set /image_publisher/flip_vertical true
# slow down the image publish rate to 1hz (1 image per second`)
rosparam set /image_publisher/publish_rate 1.0
# run the image_publisher
rosrun image_publisher image_publisher __name:=image_publisher  ~/Code/jetson-inference/data/images/humans_6.jpg

#### In a separate console ####
# pipe the image publisher output to our posenet node
rosrun <package-name> imagetaker_posenet /csi_cam_0/image_raw:=/image_publisher/image_raw
GDB Debugging with ROS⌗
#make sure ubuntu can dump files
ulimit -c unlimited
# run ROS with gdb
rosrun --prefix 'gdb run --args' <package-name> <executable>
# debug our core dump
core <name-of-core-dump-file>
# get the backtrace of the coredump
backtrace
Phew this was too many all nighters!
If you have any tips or questions feel free to leave a comment!
NOTE: this code was created as a proof of concept, do not put it in any production code unless you are absolutely sure you know what you are doing.
In my next post, I will explain how we drew the Pose results using CUDA!
Links to source code⌗
Full source code available on GitHub
Sources and Recommended Reading⌗
- Nvidia AI IOT Trt Pose on GitHub
- Tensor RT Home
- Tensor RT Documentation
- Lots of Googling